DDS Coding
| authors: | Furkan Ali Yurdakul |
|---|---|
| date: | June 2020 |
Description
There are a few changes before you can execute this test code. The first change is the laptop to a personal computer. The laptop of Sogeti can cause issues with their firewall and other securities for external communication. Secondly, you will be using an Ubuntu Windows Subsystem for Linux(WSL), because the project to test the DDS communication will be executed on the WSL.
This test code is only to show the working of DDS making use of the libraries shown in “Libraries for DDS on bare-metal”. For the extras such as USART communication or making use of the on-board button/LED will not be added.
- For this tutorial the following products have been used:
- Nucleo
- A PC running on default Windows 10 (without extra security measures)
- Ubuntu(WSL)
- Micro USB cable
- Ethernet cable CAT.5e (2x)
- STM32CubeIDE
Software design
Before you start using the ported library, study the High-Level Design below to see what is expected. The reason for this design is because of the WSL project that sends and reads from a specific topic. The software for the Nucleo will be built for this project.
![title High Level Software Design
autonumber
participant Ubuntu as wsl
participant Nucleo as nuc
[-> wsl: Start Linux project
activate wsl
wsl -> wsl: Wait for reader to match
wsl -> nuc: Start Nucleo device
deactivate wsl
activate nuc
nuc -> nuc: Create participant
nuc -> nuc: Create callback for publisher- and subscirber match
nuc -> nuc: Create a writer for topic "TOLINUX"
nuc -> nuc: Create a reader for topic "TOSTM"
nuc -> wsl
deactivate nuc
activate wsl
wsl -> wsl: Reader matches
wsl -> wsl: Send a message to topic "TOSTM"
wsl -> nuc
deactivate wsl
activate nuc
nuc -> nuc: On callback of the reader, start function "message_callback"
nuc -> nuc: Create string array[10] with "10"
nuc -> nuc: Send string array with writer to topic "TOLINUX"
nuc -> wsl
deactivate nuc
[<- wsl: back to step 10](../../../_images/plantuml-79ca9514ec46f787c54b54cdf29eca7c32e72e31.png)
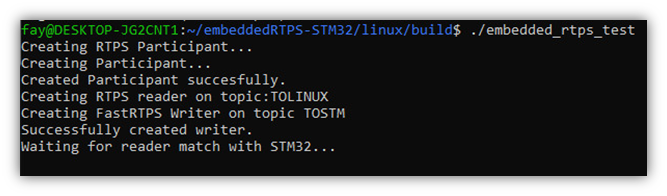
How to get and install the software on your WSL is explained in WSL project. First, start the project on WSL until it waits for a reader match. As you know the basics of DDS, a participant is created within the domain. For this participant, 2 callbacks are created to be able to notice a match on the writer and the reader.
You will need a writer to send messages to the topic “TOLINUX” and a reader to receive a message from the topic “TOSTM”. Upon making a reader for this specific topic, it should match with WSL which responses with a message. This message is recognized because of a callback that is created after creating the reader.
Function “message_callback” is called and makes the Nucleo send 10 messages containing “10” to the topic “TOLINUX”. After this, there is nothing written, which makes the test repeat itself until it crashes(see Known issues). The software for Nucleo will be explained a bit more thoroughly in the Main Code.
Hardware design
For this test the hardware is set as the following:
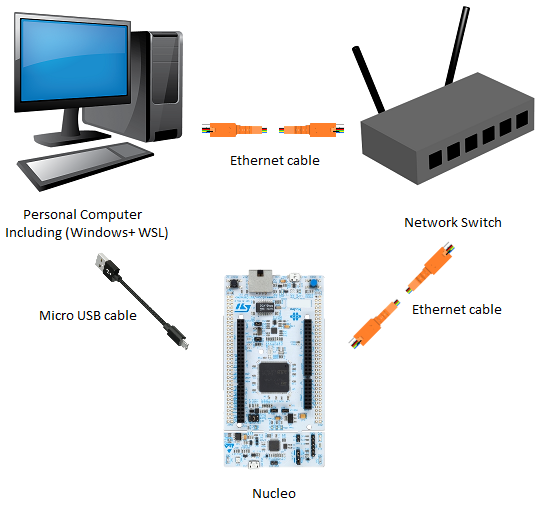
You can connect the Nucleo directly to the computer. To make it future proof the setup has a network switch in between the Nucleo and the PC. This way, you could add more Nucleo boards to see how it would perform in different circumstances. The micro USB cable is only needed to flash software on the Nucleo. For this guide, it is also used for debugging the software.
Main Code
The “main.cpp” file can be found in “/src/demonstrators/BareMetalEmbedded/embedded_rtps_stm32/Core/Src/main.cpp”. The main part that needs focus is the Software design. stated before. “StartDefaultTask” is the default task of FreeRTOS, where you call the function “startRTPStest();”.
void StartDefaultTask(void const * argument)
{

   /* init code for LWIP */
   MX_LWIP_Init();


   /* USER CODE BEGIN 5 */
   startRTPStest();

   volatile auto size = uxTaskGetStackHighWaterMark(nullptr);

   while(1);
/* USER CODE END 5 */
}
As seen in the Software design, this is where the participant, callbacks, writer, and reader are created. The initialization of DDS happens in the function “startRTPStest();”.
//Function to start the RTPS Test
void startRTPStest(){

   //Initialize variables and complete RTPS initialization
   bool subMatched = false;
   bool pubMatched = false;
   bool received_message = false;

   static rtps::Domain domain;

   //Create RTPS participant
   rtps::Participant* part = domain.createParticipant();
   if(part == nullptr){
      return;
   }

   //Register callback to ensure that a publisher is matched to the writer before sending messages
   part->registerOnNewPublisherMatchedCallback(setTrue, &pubMatched);
   part->registerOnNewSubscriberMatchedCallback(setTrue, &subMatched);

   //Create new writer to send messages
   rtps::Writer* writer = domain.createWriter(*part, "TOLINUX","TEST", false);
   rtps::Reader* reader = domain.createReader(*part, "TOSTM",  "TEST", false);
   reader->registerCallback(&message_callback, writer);

   domain.completeInit();

   //Check that writer creation was successful
   if(writer == nullptr || reader == nullptr){
      return;
   }

   //Wait for the subscriber on the Linux side to match
   while(!subMatched || !pubMatched){

   }

   while(true){}
}
The function “message_callback” starts upon receiving something from WSL. This function creates a string array length of 10. This string array contains 10 times the string “10”, which is then sent as a message through DDS to WSL.
void message_callback(void* callee, const rtps::ReaderCacheChange& cacheChange){
   rtps::Writer* writer = (rtps::Writer*) callee;
   static std::array<uint8_t,10> data{};
   data.fill(10);
   auto* change = writer->newChange(rtps::ChangeKind_t::ALIVE, data.data(), data.size());
}
These are the main parts of this project. The whole project can be found in
src/demonstrators/BareMetalEmbedded/embedded_rtps_stm32/. In the next part,
the setup of the project for the WSL will be explained.
WSL project
If you have a Ubuntu(WSL) set and ready you can go ahead and install the following dependencies:
Note
Visit https://ubuntu.com/wsl if you don’t know how to install Ubuntu on Windows Subsystem for Linux.
sudo apt-get -y update && apt-get -y upgrade
sudo apt-get install -y \
   software-properties-common \
   libboost-all-dev \
   libssl-dev \
   build-essential \
   cmake \
After installing the dependencies, the project can be cloned using the following command:
git clone https://github.com/embedded-software-laboratory/embeddedRTPS-STM32
To compile the project navigate to the “linux” folder, then use the following commands:
cd embeddedRTPS-STM32 \
cd linux \
mkdir build \
cd build \
cmake -DTHIRDPARTY=ON .. \
make
Having everything into place, you should be able to make a connection between the Nucleo and your computer. The next part will show you the results and how to get them.
Results
As seen in the Software design, the DDS project will first be started on WSL. This way it will wait for a reader to match with the Nucleo.
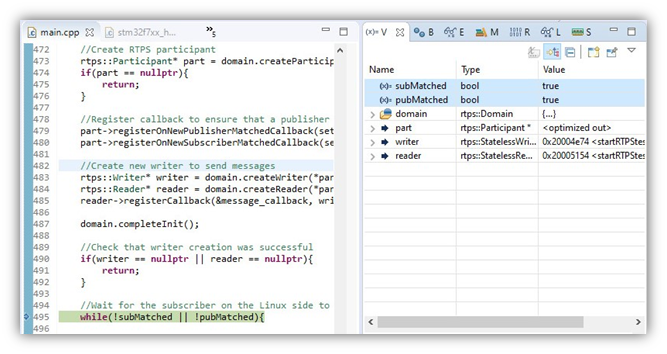
After starting DDS on the WSL, the Nucleo can be reset in order to establish a connection and sending messages back and forth. In this guide, the Nucleo is started in debug mode to show the variables changing to true when they connect successfully.
On your WSL it should look like the image below where you can see the messages “10” being received.
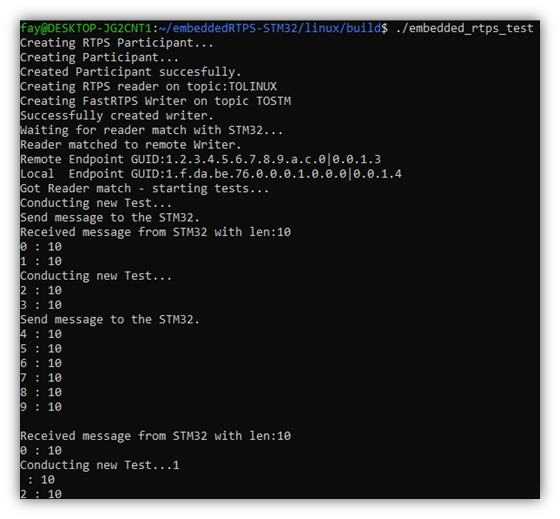
Congratulations! You have successfully implemented the communication protocol DDS on an embedded bare-metal hardware device.
The next part is needed if you haven’t encountered the same result as the guide has.
Known issues
There are a few known issues discovered when testing the software. In the picture below we see the first 2 of them:
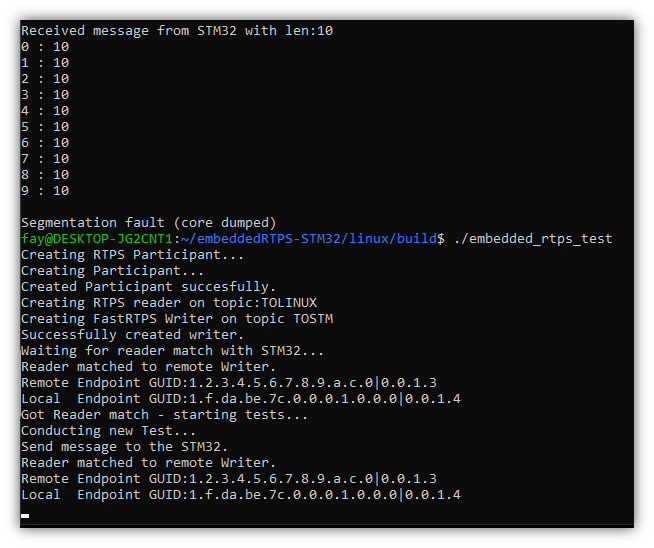
A segmentation fault, this is possible because of the software running the code infinitely and crashes at some point.
Connection issue, this could be because of the firewall your computer. It could also be possible because of the way the hardware is connected.
These 2 issues are not a problem for showing the working of DDS. But the next issue can be a big deal because it gives an error when compiling the code. The error says it’s a scoping issue, but it looks more like a compiler issue.

There has not been proper research done on these issues. These issues could be addressed in future projects. Visit the GitHub page. which still gets updates, for the project which this guide is based on.
Todo
- Research the cause of the connection issue
- Research the cause of the incompatibility with the ported library.
- A project to make multiple bare-metla devices communicate with each other for a round-trip