Matrixboard performance application
| authors: | Joost Baars |
|---|---|
| date: | June 2020 |
Description
This performance application is made for the matrix board demonstrator (see: Matrix Board Communication). The C++ matrix board implementation is used within this application (see: Matrix Board Communication in C++).
This page describes how the performance application works. The first sections focus on installing and executing the performance application. By following the steps below, the performance measurements can be repeated. After the section for executing the application, the application itself is explained (see Performance application). The last section explains how more tests can be added (see Add/remove performance tests).
General information about the application
The performance application executes an external matrix board application. The matrix board application must, therefore, be compiled first. A different matrix board application is created for each different QoS configuration.
The steps necessary to execute the performance application are described on this page.
src/demonstrators/MatrixBoard/C++/performance_measurements/custom_matrixboards/.src/demonstrators/MatrixBoard/C++/performance_measurements/performance_application/.Dependencies
The necessary dependencies for succesful compilation of the matrix board application in C++ are the following:
- CMake
- C++17 compiler (Gcc 7+ for example)
- Cyclone DDS library
Installing Cyclone DDS and the other dependencies can be found in: Clean Install with internet.
Compiling the matrix board applications
src/demonstrators/MatrixBoard/C++/performance_measurements/custom_matrixboards/.This directory contains the different QoS implementations for the matrix board application. These configurations should all be built separately into an application.
Create a build folder for building the custom matrix boards (do this within the
custom_matrixboards directory) and enter it. This can be achieved using the
following command:
mkdir build && cd build
Each of the custom configurations can then be built using the command:
sh ../build_all.sh
This is a shell script that builds all the different configurations.
Note
Manual compilation
The shell script builds all the different configurations. Building these configurations can also be done manually by building every matrix board application one by one. Manual compilation is not advised as it takes more time and is more prone to errors.
Manually, each configuration can be built with the commands:
cmake -D CUSTOM_MBC=<custom configuration name> .. && make -j4
In this command, <custom configuration name> should be replaced by the
desired configuration. For the default performance application, each
configuration in the custom_matrixboards directory should be compiled.
CUSTOM_MBC CMake parameter defines what application is being compiled.Compiling the performance application
src/demonstrators/MatrixBoard/C++/performance_measurements/performance_application/.Then create a build folder for building the performance application and enter it:
mkdir build && cd build
The performance application can then either be built for the slave or the master. There should only be one master application active at the same time. There may be multiple slaves active.
The master application can be built with the following command:
cmake -D PERFORMANCE_ACTOR=Master .. && make -j4
The slave application can be built with the following command:
cmake -D PERFORMANCE_ACTOR=Slave .. && make -j4
Executing the performance application
The master performance application can be executed with various parameters. These parameters will be explained in this section. The slave application will also be described.
Both these applications give information about their parameters when executed with no parameters. So when you forget the parameters, execute the application without parameters.
src/demonstrators/MatrixBoard/C++/performance_measurements/performance_application/,The page Example performance application contains an example for running this application.
Note
Synchronization
For the application to work correctly on different devices, the time should be synchronized. Synchronizing the time is explained on the page: Matrix board performance application system setup.
Slave
The slave application can be executed using the following command:
./Slave <MatrixBoard ID>
- MatrixBoard ID: The ID/position of the matrix board
The slave application must be executed before the master application. Multiple slave applications can be executed at once. The connect and disconnect durations are measured for each slave. The lowest, average, and highest values are stored in the logging file.
Master
Only one parameter for the master application is necessary. That’s the matrix board ID. The application can be executed using the following command:
./Master <MatrixBoard ID> <Name of logging file> <Execution amount> <Application Location> <Application name>
- MatrixBoard ID: The ID/position of the matrix board
- Name of logging file: OPTIONAL: the name of the logging file, by default:
logging.csv - Execution amount: OPTIONAL: The number of executions each configuration
has, by default:
4 - Application location: OPTIONAL: the location containing the matrix board
applications, by default:
../../custom_matrixboards/build/ - Application name: OPTIONAL: By default, all custom matrix board applications
are executed. With this parameter, you can only measure one custom application.
For example
defaultfor the default configuration.
Note
Execution of the program
The slave applications must be started first!
The <Matrixboard ID> parameter should be unique for every matrix board. Additionally, it may not be less than 1.
The order at which matrix boards and their associated IDs are started does not matter.
If the logging file exists already, the new data is appended to the existing data.
The application location should include all executables for the matrix boards
that are used by the TestsImplementation class. This is by default all of
the applications in the custom_matrixboards directory as well as the
default configuration. Each of these can be build using the shell script
build_all.sh in the custom_matrixboards directory
(see Compiling the matrix board applications).
Example performance application
An example of starting the performance application is given in this section.
Execute the slave first. Start it with the command below.
./Slave 1
Now, a master can be started in a new terminal to see the performance application going.
./Master 4
The default configuration executes each test only four times. When both the master and slave stop running, the performance test is done. The results can be seen by executing:
cat logging.csv
This shows all the results. See CSV output for an explanation of how the logging can be interpreted.
CSV output
The output of the performance application is a CSV (comma-separated value) file. When a custom matrix board application is executed, the name is stored in the CSV file.
A separate page is written for analyzing this data and automatically calculating the average values for each configuration (if the execution amount is >2). See: Performance measurements data analysis.
The paremeters are shown in the following three tables. The first 3 parameters of the measurements:
| 1st | 2nd | 3rd | |||
| Lowest connect duration | Average connect duration | Highest connect duration | |||
These parameters are for the connect duration. The connect duration of all devices that connect to the master’s matrix board topic are measured. The lowest, average and highest values are stored (1st, 2nd and 3rd parameter).
The second 3 parameters of the measurements:
| 4th | 5th | 6th | |||
| Lowest disconnect duration | Average disconnect duration | Highest disconnect duration | |||
These parameters are for the disconnect duration. The disconnect duration of all devices that disconnect from the master’s matrix board topic are measured. The lowest, average, and highest values are stored (1st, 2nd, and 3rd parameter).
The last 3 parameters of the measurements:
| 7th | 8th | 9th | |||
| CPU usage [%] | Physical memory usage [kB] | Virtual memory usage [kB] | |||
These parameters are for the resource usage. The CPU usage, physical memory usage, and physical memory usage are measured. These measurements are all executed on the master’s matrix board application.
Note
All these parameters are written on the same line!
Matrix board application
The matrix board application is the same as is described in Matrix Board Communication in C++.
This application has, by default, debugging built-in. The debugging sends a
timestamp to the Debug topic. At the following moments, a timestamp is sent:
- When the matrix board connects to a matrix board topic
- When a matrix board connects to its own topic
- When a matrix board writer or reader disconnects
This debugging can be used for the performance application to calculate the connect and disconnect duration.
Sequence diagram
The sequence diagram below shows how communication with DDS is used within the
performance application. In this sequence diagram, Matrix board 2 is already
active and Matrix board 3 is started at the beginning of the sequence diagram.
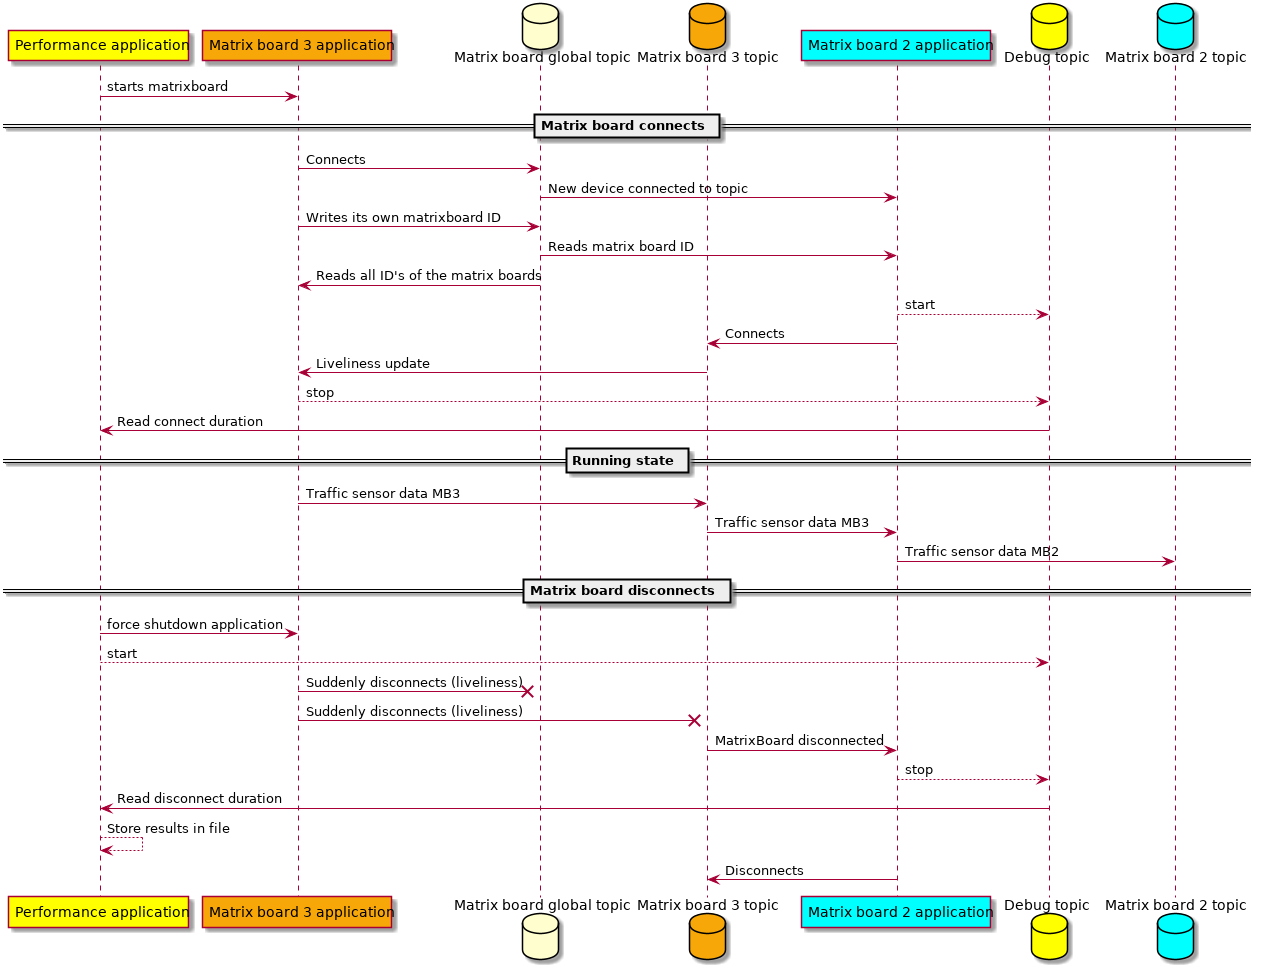
This sequence diagram is split into three parts. The Matrix board connects part
shows the communication flow when a new matrix board connects to the network. First,
the matrix board ID is sent to the Matrix board global topic. When the ID
is received by Matrix board 2 application, it can connect to the
Matrix board 3 topic. Before connecting, the starting timestamp is sent towards
the Debug topic. When Matrix board 3 application receives a liveliness update
that a new reader has connected, the stop timestamp is sent towards the Debug topic.
The connect duration is measured by subtracting the start timestamp from the stop timestamp.
This is measured on Matrix board 3 topic instead of the Matrix board global topic
because the global topic has certain QoS policies that cannot be altered (else the global
topic won’t work as expected). The Matrix board 3 topic does not have QoS policies that
must be configured. Therefore, Matrix board 3 topic is used for the measurements in the
sequence diagram.
The Running state is the stable state. In this state, the matrix board sends
the sensor data towards its own topic. This can be read by other matrix boards
(in this case Matrix board 2).
The Matrix board disconnects state shows the communication flow when a matrix board
disconnects. Two topics are notified by this action. Matrix board 2 is notified by
both topics, and responds by disconnecting from the Matrix board 3 topic. At the
moment Matrix board 3 application is shut down, the start timestamp is sent towards
the Debug topic. When Matrix board 2 application is notified by the
Matrix board 2 topic, it sends the stop timestamp towards the Debug topic.
Performance application
This section describes how the performance application works using the class diagram.
This section is divided into the Master and Slave application.
Below, the deployment diagram is shown for the performance application. In this
diagram, the communication between the master and slave application can be seen.
This diagram shows that each application creates one matrix board application.
The matrix board application sends data to the Debug topic. The
Debug topic is being read by the master application. There is also an
Application topic which is used to send the configuration to the slave
applications. The slave application can then start the same application as the
master.

Master
The class diagram of the Master application is displayed below.
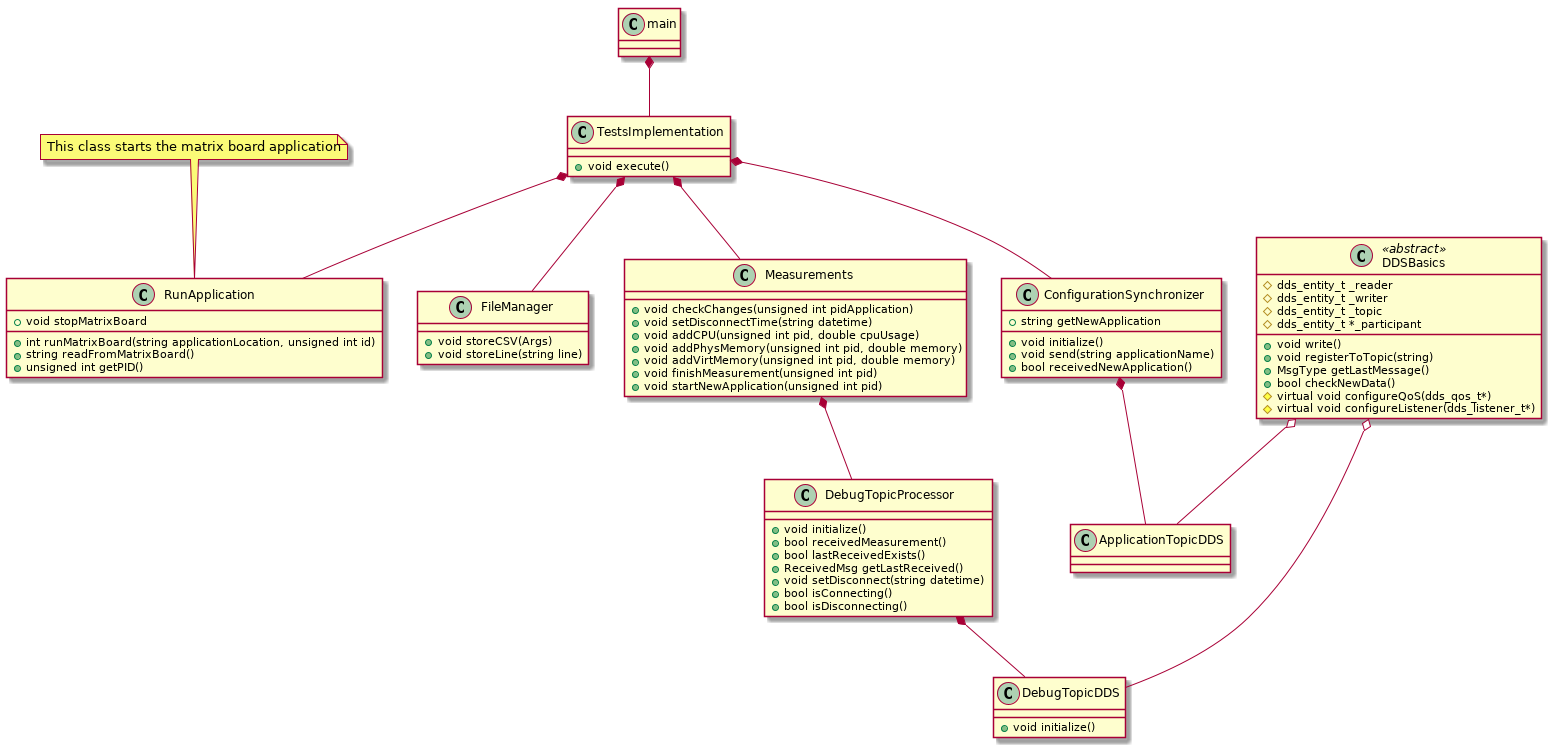
The main is the start of the application. Here, the input parameters are
processed and the TestsImplementation is executed.
The TestsImplementation class is where the tests/performance measurements
are implemented. This class is the only class that needs to be changed for new
performance measurements. This class sends the name of the application that is
executed to the slave with the ConfigurationSynchronizer class (using DDS).
This way, the slave and master can both start the same application (with the same
configuration). By doing this, the started applications are compatible with each other.
After sending the name of the application to the slave, it executes that
application. This application is executed multiple times until the
Execution amount is reached of Executing the performance application.
This execution amount stands for the number of times a certain configuration
is executed. So with an execution amount of 50, each configuration is executed
50 times. This results in 50 measurements for one configuration (the configuration
mentioned here are the configurations that can be found in the
custom_matrixboards directory).
When the application is started, a loop starts. This loop measures the CPU, virtual memory, and physical memory usage of the application. The loop takes a random time from 2 to 7 seconds. This time was chosen because a static time could influence the results (have the same result, if it is a deterministic application). The debug topic is also being checked for any new messages. When the loop ends, the matrix board application is terminated with a kill signal and the start of the disconnect duration is stored.
The Measurements class manages the measurements. This class reads
from the debug topic using the DebugTopicProcessor class and stores the
results in a CSV (comma-separated value) file using the FileManager class. The
Measurements class combines the measurements from the DebugTopicProcessor
class to get the connect and disconnect duration from the timestamps it receives (by
substracting the start timestamp from the stop timestamp). The DebugTopicProcessor
manages the individual messages from the debug topic and stores them based on their
classification (see below for an explanation of how they are classified).
The matrix board application sends messages to the debug topic. These messages contain
3 different parameters, a string for a timestamp, a classifier, and an ID. The timestamp
gives the ability to calculate the connect/disconnect duration. The classifier can be four
different values. It can be connecting (start during a connect), connected (stop
during a connect), disconnecting (start during a disconnect), and disconnected
(stop during a disconnect)(see Sequence diagram). The ID of each message on the
debug topic is the ID of the topic where the measurements are performed on. In the case
of the sequence diagram above, it is 3 (see Sequence diagram, it’s 3 because the
measurements are executed on the Matrix board 3 topic).
Note
Master
The master application should have at least one slave connecting to its topic for the measurements. Therefore, a slave with an ID less than the master’s ID should be active.
Note
Multiple masters
There can be multiple masters, but it must be verified that they execute the same matrix board configuration (and don’t execute different configurations). Each master only reads the data on the topic of his matrix board. Therefore, this would give different results for each master.
Slave
The class diagram of the slave application can be seen below.
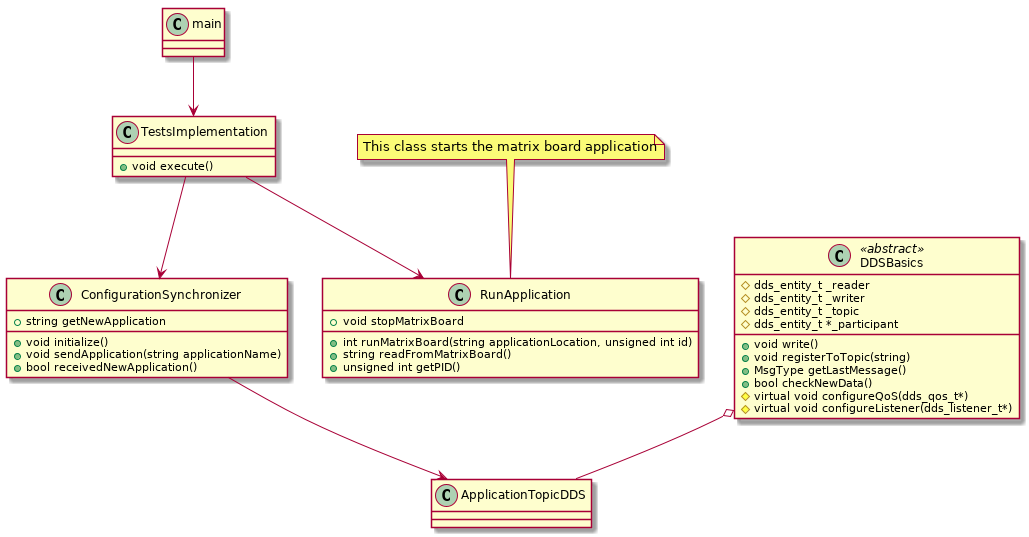
The basics of this application work the same as the Master application. The
main also parses the input parameters of the application. The
TestsImplementation reads from the application topic with the
ConfigurationSynchronizer class. If the Master sends a message containing an
application, this application is executed. If a matrix board application was
already running on the slave, this application would be forcefully stopped
(these connect and disconnect durations are not measured).
Participant
There are 2 different participants in the performance application. One for the
application topic for sending/receiving the application that must be executed.
The other one is for the debug topic. This one is created in the Measurements
class and deleted when the object is deleted. This is necessary because writers and
readers on a topic are only removed when the participant is deleted and not when
the object that creates the writer/reader is deleted. When a Measurements object
is deleted, the corresponding reader/writer also needs to be removed. This is achieved
by having a separate participant for the Measurements class, which is removed when a
Measurements object is deleted.
In the future, the DebugTopicManager class could become a static class, or singular
readers/writers could be deleted from a topic (if this is possible within Cyclone DDS).
Resource usage
This chapter describes how the resource usage (CPU, physical memory and virtual memory) is measured.
The CPU, physical memory, and virtual memory are all measured using the Linux system calls. Linux keeps track of each application what resources it uses. These values are read within the performance application using the PID (Process ID) of the matrix board application. Therefore, these measurements do not influence the resource usage of the matrix board application.
The CPU usage is only read every second because of a limitation for measuring the CPU usage. The CPU usage must be calculated with 2 values after a certain time. Therefore, the CPU usage could have a bigger deviation between the measurements (because of fewer measure points).
The results of the resource usage within the software are tested by comparing
it with the top command of Linux. These values corresponded with the results
within the software.
Add/remove performance tests
Within the master application, new tests can be created easily. The slave does not have to be changed since it receives the matrix board application it needs to execute from the master.
TestsImplementation class of the master:src/demonstrators/MatrixBoard/C++/performance_measurements/performance_application/tests_implementation_master/In the function void TestsImplementation::execute(const unsigned int matrixboardID),
new matrix board applications can be added.
A new application can be added using the following C++ code:
sendAndExecuteApplication(matrixboardID, "durability_persistent");
This line of code starts an application with the name of the second parameter.
In this case, the name is durability_persistent. This should be the name of
the matrix board application that is stored in the application location.
This location points by default to
src/demonstrators/MatrixBoard/C++/performance_measurements/custom_matrixboards/build.
This application is executed once or multiple times based on the
Execution amount parameter (by default 4 times).
Custom matrix board applications can be added in the
src/demonstrators/MatrixBoard/C++/performance_measurements/custom_matrixboards/
directory. A directory containing a specific_matrixboard.cpp file should be created. The
contents of this file are shown in the code-block below. The wanted QoS policies can be
added at the place where the // Add custom configurations in this function comment is.
#include "matrixboard/dds/specific_matrixboard.hpp"

namespace matrixboard {

/**
 * @brief configures the qos policies
 *
 * @param qos the qos object
 */
void SpecificMatrixBoard::configureQoS(dds_qos_t *qos) {
    // Add custom configurations in this function
    dds_qset_liveliness(qos, DDS_LIVELINESS_MANUAL_BY_PARTICIPANT, DDS_MSECS(2500));
}

} // namespace matrixboard
The liveliness should always be configured and should always be less than 4 seconds. This is because the
ActiveMatrixboards topic should be slower compared to the specific_matrixboard
topic with the liveliness. Otherwise, the connect or disconnect duration could be skipped
to be sent towards the debug topic. The liveliness can be adjusted though in the code-block above.
For ease of compiling all the custom matrix boards, the new application should
be added to the build_all.sh script. So all custom matrix boards
can be compiled using one build script. The new application can be added by
appending the following to the build_all.sh file:
cmake -D CUSTOM_MBC=unreliable .. && make -j4
In this example, unreliable must be replaced by the name of the newly added
application.