Docker Guide: How to create and run a Docker Image
The following guide will discuss all the necessary steps in order to create a Docker image and also how to run a container from an image.
Installing Docker
The first step is to install Docker on our machine of interest. For Windows/MacOS we require Docker Desktop. This can be downloaded from here. An important note is that we prefer the Edge channel rather than the Stable channel, since the Edge channel enables us to build on x86 machines images for other architectures such as ARM (see Building Multi-Arch Images chapter).
For Linux Systems such as the Raspberry Pi:
$ sudo apt-get update && sudo apt-get upgrade
$ curl -fsSL https://get.docker.com -o get-docker.sh
$ sudo sh get-docker.sh
Add a Non-Root User to the Docker Group:
$ sudo usermod -aG docker [user_name]
Check Docker version:
$ docker version
Docker Workflow
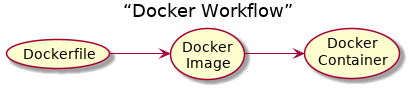
We begin by describing the general Docker workflow. Usually, we begin by creating a Dockerfile. In a nutshell, a Dockerfile is a script which describes the commands we would like to execute within a container. This container is then saved as a new Docker image. Let’s provide an example for the sake of understanding:
FROM alpine:latest

RUN apk update && apk add git && apk add bash

WORKDIR /src/

RUN git clone https://github.com/eclipse-cyclonedds/cyclonedds.git
This example clones the latest Alpine Linux image using the FROM command,
updates and installs git and bash from the apk repo using the RUN command.
Then creates a folder src moves into it and clones the CycloneDDS repo.
The result is an image that runs Alpine Linux, has git and bash installed and the
repo CycloneDDS in a src directory. The above described workflow can be seen
in the following diagram.
The following link presents some of the Best practices for writing Dockerfiles. In addition, the following link is the Dockerfile reference guide.
Similarly to any other code hosting service (e.g. github, bitbucket etc.) there is a Docker Hub that hosts Docker images. As a result, in some cases the workflow from above can be changed to skip building the image from a Dockerfile to simply cloning a pre-existing image that satisfies that particular need.
Multi-stage Builds
Multi-stage builds refer to Dockerfiles that use various images throughout the building process. It is easier to explain this with an example, consider the following:
FROM alpine:latest AS build

RUN apk update && apk add git && apk add cmake && apk add --no-cache build-base && \
    apk add maven && apk fetch openjdk8 && apk add openjdk8 && apk add linux-headers && \
    apk add bash

WORKDIR /src/

RUN git clone https://github.com/eclipse-cyclonedds/cyclonedds.git

WORKDIR /dds/

WORKDIR /src/cyclonedds/build

RUN cmake -DCMAKE_INSTALL_PREFIX=/dds/ .. && \
    cmake --build . && cmake --build . --target install

FROM alpine:latest

RUN apk update && apk add bash

WORKDIR /dds/

COPY --from=build /dds/ ./
The first stage named BUILD will start from the latest Alpine Linux image and
will install all the dependencies required by CycloneDDS (more on these dependencies
can be found Setup Guide for CycloneDDS). Subsequently, it clones the CycloneDDS repo
and builds it. Then we move to the second and final stage, to which we will refer to
as the DEPLOY stage (separation of the two stages can be seen from the different
FROM commands). In the DEPLOY stage, we start from the clean latest Alpine
Linux image and we copy only the executables we compiled in the previous stage.
This separation enables us to provide to the end user only the executables required
for our application in a minimal Linux environment. Also, the resulting image is
drastically smaller in size.
Building Docker Images
After creating our Dockerfile, it is time to build our image which can be done by navigating to the folder of our Dockerfile and executing:
$ docker build -t <image name> .
Similarly, we can also build images for each of the different stages we created, using:
$ docker build --target <stage name> -t <image name> .
Finally, using $ docker images we can see all the images in our system.
The build process can be seen in the following video.
Running Docker Containers
Containers are running instances of images. In order to create a new container we run the following command:
$ docker run --network="host" -ti --name <container name> <image name> bash
We provide a meaningful name for our new container and the name of an already existing image. Also, note that there are many different options, but in the case of DDS we want our container to have the IP address of the host, so that it can communicate over the host’s network.
Warning
Host networking does not work on Docker Desktop for Windows/MacOS. Basically, the command can be used as is but the IP address will not be the same as the one the host receives from its network. Nevertheless, containers can still communicate between each other and within the same container, just not with the outside network.
Furthermore, we can open another terminal on an already running container by using:
$ docker exec -it <existing container name> bash
Note
In all of the above mentioned commands we execute bash since it is installed
on our images. If you do not have bash installed use /bin/sh instead.
Building Multi-Arch Images
Finally we describe how we can actually build images for different architectures than
the one on the machine we are currently building on. This is useful in the case we
want to build an image for the Raspebrry Pi on a x86 Windows Machine which has more
processing power. A pre-requisite for this is to have the Edge channel of Docker
Desktop installed. First we check what buildx builders are available and create a new builder
using:
$ docker buildx ls
$ docker buildx create --name <builder name>
We select that specific builder using:
$ docker buildx use <mybuilder>
$ docker buildx inspect --bootstrap
Finally, we build and push our new image for the selected architecture to a new Docker Hub repo using:
$ docker buildx build --platform linux/arm/v7 -t <username/repo name>:<image name> --push .
Building Demo Image
The Dockerfile created for the C implementations of the Round trip as well as the
different versions of the Matrix Board Communication can be found in the
~/src/docker/Build_C_MBC_Roundtrip/ directory of this repository. First,
we need to build this image by navigating to the above mentioned directory
and using:
$ docker build -t <image name> .
Then we can create a container of this image using:
$ docker run -it --network="host" --name <container name> <image name>
For more information on how to execute the experiments please refer to the docker sections of each respective Round trip and Flood in C and Matrix Board Communication in C demonstrator.
Links
- Shipping C++ Programs in Docker: A Journey Begins: https://tinyurl.com/yxn4gr3s
- Building Multi-Arch images: https://www.docker.com/blog/multi-arch-images/